
Default Recipients
All eligible parents (of enrolled students), enrolled students, and staff currently enrolled in the selected school(s) will receive the alert message by default.
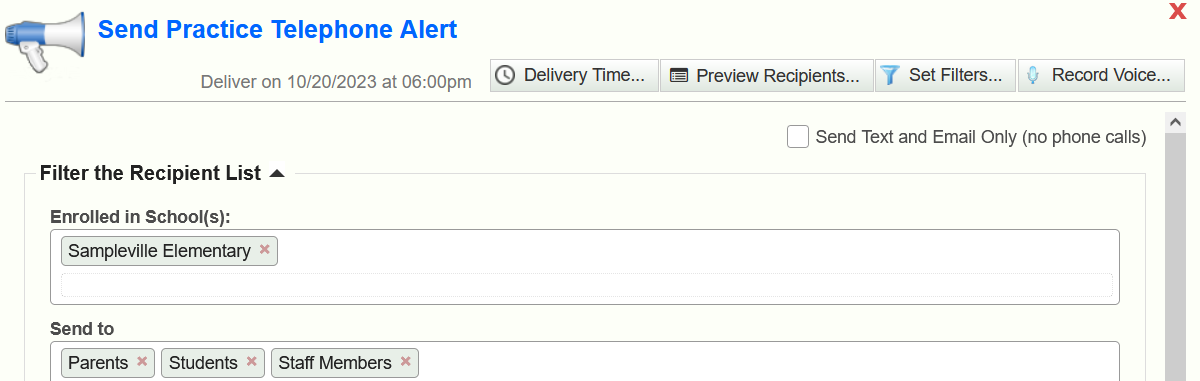
You can exclude groups of recipients if desired:
If you only want to send a message to staff, then click on the red X in the Students button and Parents button to remove these recipients.
If you only want to send a message to parents, then click on the red X in the Students button and Staff Members button to remove these recipients.
If you only want to send a message to students, then click on the red X in the Parents button and Staff Members button to remove these recipients.
You can change the selected school if desired:
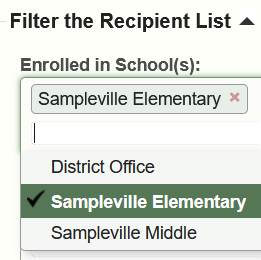
If you want to add additional schools in the district to receive the alert, then you can choose additional schools by clicking in the box below the first school button. Holding down the Shift key while clicking with your mouse allows you to select multiple schools.
If you want to remove schools from the alert, click on the red X in the school's button.
Preview Recipients
Clicking on the "Preview Recipients" button in the upper right-hand corner of the form shows the list of students/staff who meet the alert selection filter criteria. The recipient preview list does not consider the various recipient message opt-in & opt-out settings defined in the SIS.
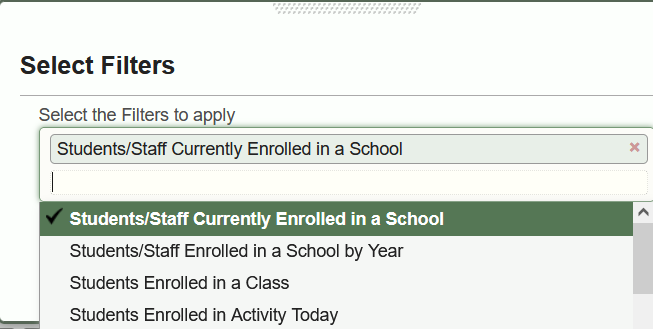
Adding Recipient Filters
Clicking on the "Set Filters” button in the upper right-hand corner of the form opens the Select Filters form shown below.
Clicking on the box below the Students/Staff Currently Enrolled in a School button brings up a list of additional filters.
Filter Types
Students/Staff Currently Enrolled in a School
Students/Staff Enrolled in a School by Year
Students in a Grade Level
Students Enrolled in a Class
Students Enrolled in Activity Today
Students with Discipline Referral Today
Students with Low Grade Averages
Student Primary Language
Student Gender
Students who ride on Bus Number
Students at a Bus Stop
Students Expected to Re-Enroll Next School Year
Students with Incomplete First-Day Online Form Packets
Parents with no Web User Account
Parents who have a Web User Account
Students Absent from School Today for Unknown Reason
Students Absent from a Period Class Today for Unknown Reason
Distance Learning Students Unengaged for Unexcused Reason
Distance Learning Unexcused Unengaged for any Class Period
Students with a Negative Account Balance
Students with No Health Screen Form Today
Staff Members by Job Title
Filter Examples
Choosing ‘Students/Staff Enrolled in a School by Year’ allows you to select a specific school year. This is useful if you have pre-enrolled students in school for the upcoming school year (that has not started yet) but you want to exclude them from an alert that is only applicable for students enrolled in the current school year.
Choosing ‘Students Enrolled in a Class’ will allow you to select specific class sections. Note: When you use a filter to send a targeted alert to a specific class section, it only includes staff assigned to that specific class section (it does not include all staff).
Choosing ‘Students Enrolled in Activity Today’ allows you to select an activity list (such as Field Trip, Band, Choir, etc.).
Choosing ‘Students Absent from School Today for Unknown Reason’ finds all absent students with un-cleared absences in ADA grade level classes (meaning an Absent reason of ?) and then alerts just those parents. This filter is also used in a template which we will cover later when we discuss Recurring Alerts.
Choosing ‘Students Absent from a Period Class Today for Unknown Reason’ finds all absent students with un-cleared absences in a specific class period (meaning an Absent reason of ?) and then alerts just those parents. This filter is also used in a template which we will cover later when we discuss Recurring Alerts.
Choosing 'Students with Low Grade Averages' finds all students that currently have a grade below the specified threshold value (%) in at least one class. Additional filters can be added if desired to target the alert for students in specific grades or classes.
Class Filter Example
Please note that you can add multiple filters but they are cumulative, meaning the more conditions you add the narrower the selection becomes. For example, if you choose a multi-grade section (like Band) and also choose Students in a Grade Level (like Grade 7) then the alerts would only go to seventh graders in enrolled in band. You can choose multiple class sections and multiple grade levels, but if you choose both grade levels and class sections then you will restrict the student members of the sections to the grade levels selected. Unless you know exactly why you would want to choose grade levels and class sections (targeting seventh grade band members as in the example), it is best not to use multiple filters as they can become very complex logically.

After you have added the filters you want, press the Save button.

If you click on the box below Class Sections, a list opens up with all of the class sections in your school. By holding down the Shift key you can select multiple sections with the mouse. Notice that as you select sections, they become buttons showing which sections have been selected. You can remove a section at any time by clicking on the red X in the button.

We could have performed a similar action using grade levels instead of class sections if we had selected grade levels as the criteria in the filter setup form.