
What is SchoolWise?
- SchoolWise is a Microsoft Windows based, District-Wide, Multiple School, Multiple Year, Student Information Management Database. SchoolWise is 100% CALPADS compliant.
- SchoolWise data is LIVE. If you make a change to a student, staff member, course etc. it happens right away and is reflected on other users workstations and reports.
- The Golden Rule of SchoolWise! – NEVER DELETE ANYTHING. If you think you need to delete a student, teacher, course, section etc. Call SchoolWise support first! In most cases you will use remove or un-enroll – but rarely ever delete. Because SchoolWise is a multi-year system it needs to save historical data, not remove it. When something is deleted from SchoolWise it’s very difficult to recover, sometimes impossible. So keep that in mind as you use the system. When in doubt, call support. (800-727-6817).
How do I run SchoolWise?
- "Double-click" the SchoolWise icon
 located on your desktop.
 - You will know SchoolWise has run successfully when the login screen is displayed. If there are any errors during the startup process, please write them down and contact support.
How do I log in to SchoolWise?
| 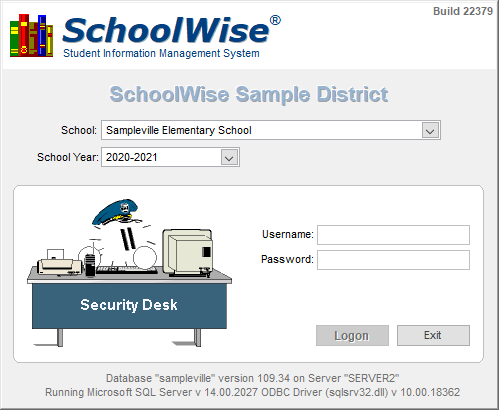 |
The main screen of SchoolWise
Once you log into SchoolWise you will see the main window below:
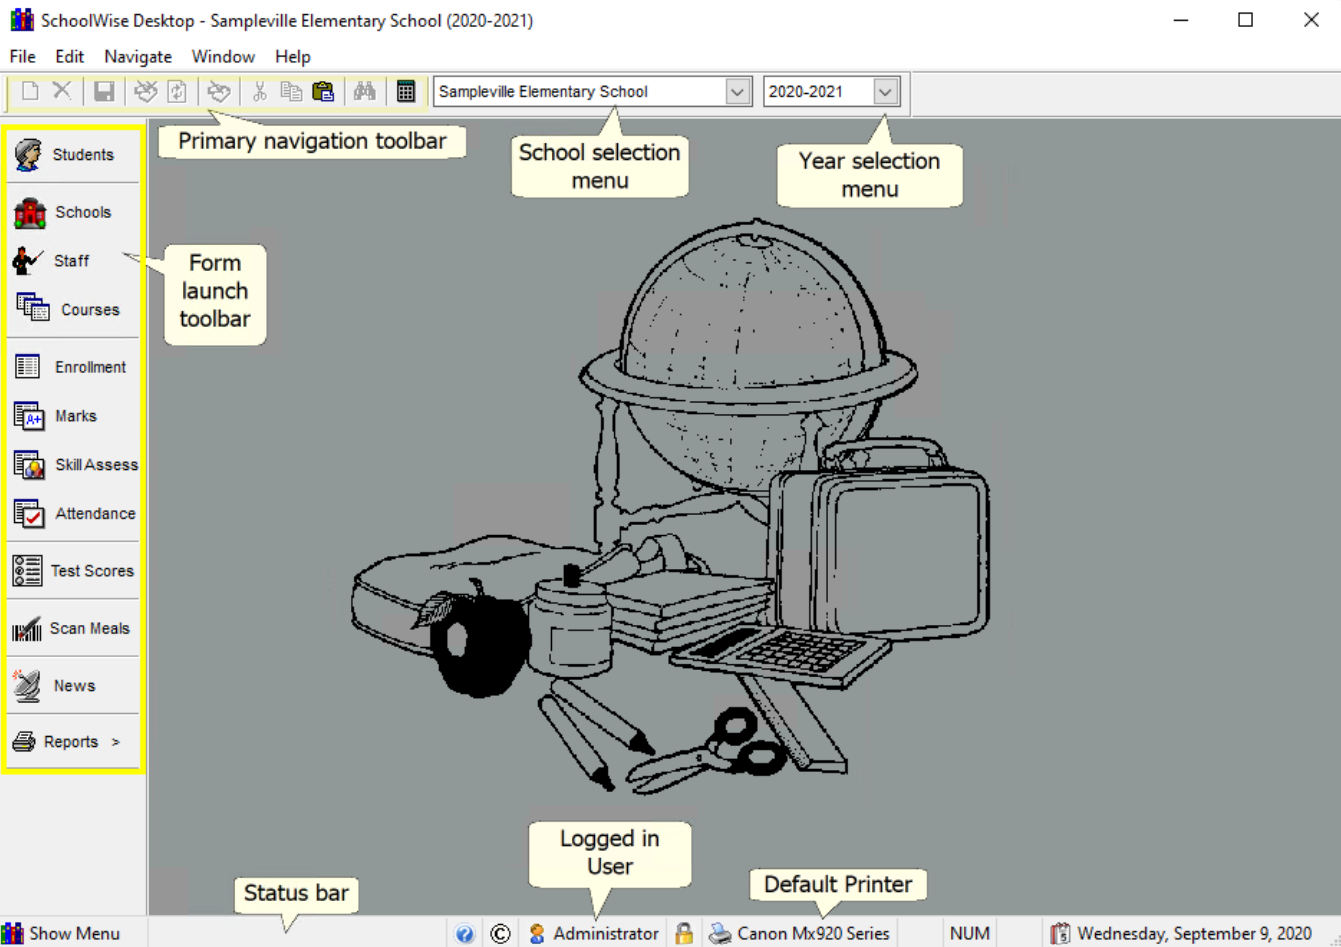
Title Bar - SchoolWise, like many other programs has several parts to the main screen. The first part of the window is the top right, called the title bar. This Title bar will always display the SchoolWise version number – the school and year which you are currently logged into.
Menu Bar - Located directly underneath the Title Bar are the Main Pull down Menus of SchoolWise. File, Edit Navigate, Window & Documentation. This is referred to as the Menu Bar and each of these menus and options are explained in the SchoolWise Help file.

Primary Navigation Toolbar – (example above) The smaller set of Icons located under the Menu Bar is called the Primary Navigation Toolbar – think of it as your control panel for all of the forms within SchoolWise. This toolbar controls whatever form is in focus or (on top). For example: If you have two forms open, the Staff & Students form, this toolbar will control the one that is on top of the other one. You will notice that if the Student form is on top of the Staff form, the Staff form is “grayed out” or not in focus.
Logged in School Menu – In the middle of the toolbar you will notice the current school and Year View pull down menus. They will always show you what school and what calendar year that you are currently logged into.
Menu Icons Overview – Each of the menu icons have a different purpose, below is a review for each of them.
![]() New [Ctrl+N] - The "New" button is used to create a new record in the active window. This button has the same effect as choosing "Add New" from the Navigate menu. Or “Right Clicking” on menus and lists in SchoolWise and selecting “Add New”.
New [Ctrl+N] - The "New" button is used to create a new record in the active window. This button has the same effect as choosing "Add New" from the Navigate menu. Or “Right Clicking” on menus and lists in SchoolWise and selecting “Add New”.
![]() Delete – Be very careful when using delete. This icon will delete (permanently remove) the currently selected record. Deleting records is almost NEVER what you want to do. If you have a question as to if you should or not – please call support. (800-727-6817)
Delete – Be very careful when using delete. This icon will delete (permanently remove) the currently selected record. Deleting records is almost NEVER what you want to do. If you have a question as to if you should or not – please call support. (800-727-6817)
![]() Save [Ctrl+S] - The "Save" button is used to save any changes you have made to the active window. This button has the same effect as choosing "Save" from the File menu.
Save [Ctrl+S] - The "Save" button is used to save any changes you have made to the active window. This button has the same effect as choosing "Save" from the File menu.
![]() Revert - The "Revert" button is used to discard your current changes to the information displayed in the active window. Your changes will be discarded, and the information last saved will be displayed in the window. This button has the same effect as choosing "Revert" from the File menu.
Revert - The "Revert" button is used to discard your current changes to the information displayed in the active window. Your changes will be discarded, and the information last saved will be displayed in the window. This button has the same effect as choosing "Revert" from the File menu.
![]() Refresh - [F5] - The "Refresh" button is used to update the active forms’ displayed information from the server. If you have made a change to student that you don’t see reflected in the active form – try clicking the refresh button and the data will update.
Refresh - [F5] - The "Refresh" button is used to update the active forms’ displayed information from the server. If you have made a change to student that you don’t see reflected in the active form – try clicking the refresh button and the data will update.
![]() Edit Mode - Use the "Edit Mode" button when you need to make changes to a form. Forms are normally in "Read Only" mode. Switching to Edit Mode allows data entry to the form. Provided the user that is logged in, has permission to edit the form. In some forms it may be necessary to enable edit mode in the main form to edit sub forms. You may also “right click” to enable Edit Mode in most cases.
Edit Mode - Use the "Edit Mode" button when you need to make changes to a form. Forms are normally in "Read Only" mode. Switching to Edit Mode allows data entry to the form. Provided the user that is logged in, has permission to edit the form. In some forms it may be necessary to enable edit mode in the main form to edit sub forms. You may also “right click” to enable Edit Mode in most cases.![]() Locking Edit Mode - If you want to make changes or data entry for more than one record, you can lock Edit mode on. To do this, “double click” or hold down the control key then “left click” the Edit mode icon. You will see a lock appear on the icon, this will keep edit mode on until you click the icon again or exit the form. This is really helpful when making changes to lots of students or staff!
Locking Edit Mode - If you want to make changes or data entry for more than one record, you can lock Edit mode on. To do this, “double click” or hold down the control key then “left click” the Edit mode icon. You will see a lock appear on the icon, this will keep edit mode on until you click the icon again or exit the form. This is really helpful when making changes to lots of students or staff!
![]() Cut - [Ctrl+X] - The "Cut" button is used to remove selected text and copy it to the Windows clipboard. This button has the same effect as choosing "Cut" from the Edit menu.
Cut - [Ctrl+X] - The "Cut" button is used to remove selected text and copy it to the Windows clipboard. This button has the same effect as choosing "Cut" from the Edit menu.
![]() Copy - [Ctrl+C] - The "Copy" button is used to copy selected text onto the Windows clipboard. This button has the same effect as choosing "Copy" from the Edit menu.
Copy - [Ctrl+C] - The "Copy" button is used to copy selected text onto the Windows clipboard. This button has the same effect as choosing "Copy" from the Edit menu.
![]() Paste - [Ctrl+V] - The "Paste" button is used to paste the contents of the Windows clipboard onto your selected area. This button has the same effect as choosing "Paste" from the Edit menu.
Paste - [Ctrl+V] - The "Paste" button is used to paste the contents of the Windows clipboard onto your selected area. This button has the same effect as choosing "Paste" from the Edit menu.
How do I Search for a Student or other Info? – SchoolWise has a general Search tool located on the Primary Navigation Toolbar called the Find Tool. You might here us refer to it as the “Binocular Tool”.
![]() Find - [Ctrl+F] - The toolbar "Find" button is used to launch the Find Window. For example, you can use the Find button to locate a specific Student or Family or Staff member. When no forms are open the find button is disabled. To enable the Find button – launch one of the forms on the left (Student, Staff or Families) and you may now search using Find. This button has the same effect as choosing "Find" from the Navigate menu. Below is an example of the "Find" window.
Find - [Ctrl+F] - The toolbar "Find" button is used to launch the Find Window. For example, you can use the Find button to locate a specific Student or Family or Staff member. When no forms are open the find button is disabled. To enable the Find button – launch one of the forms on the left (Student, Staff or Families) and you may now search using Find. This button has the same effect as choosing "Find" from the Navigate menu. Below is an example of the "Find" window.
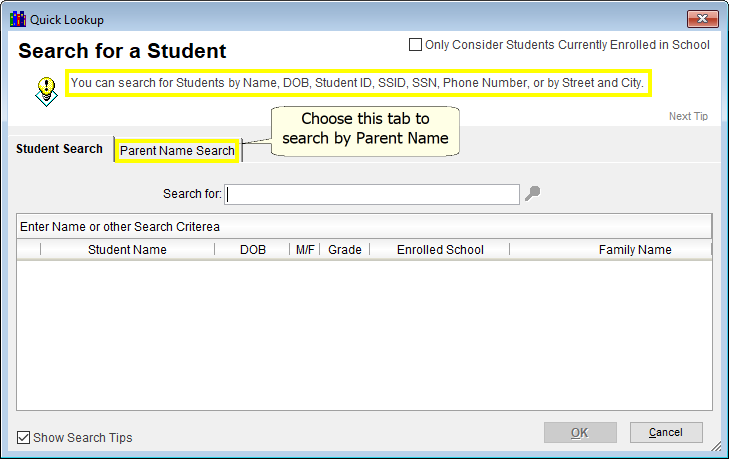 | By default the Find tool searches the entire district for whatever you are looking for. If you would like to search just in the school you are logged into – make sure to “left click” on the checkbox in the top right hand corner of the Find box. You might also notice the Tips that will help you search more accurately. To see each of the tips “left click” on the “Next Tip” text to see all of the specific ways and items that you can search for. When you are ready to start a search – type what you are looking for into the Search for: text box and then hit the “Enter” key. The Search results will display below. If you can’t find the name that you are looking for, try using fewer or shorter search keywords. For example, if you can’t find “John Smith”, try using just “Smith”. The search will try to match as close as it can so sometime less is better. |
Here are some other tips on how to use the Find tool to Search more efficiently:
- If you get too many results for name searches, try using additional name parts, such as full first name and middle name.
- You can search for Students by Name, DOB, Student ID, SSID, SSN, Phone Number, or by Street and City.
- To search by Phone Number, enter is like this: “999-999-9999” or “(999) 999-9999”.
- To search for Birthdates, enter the date using the following format: “mm/dd/yyyy”.
![]() Calculator - [Ctrl+F] - The toolbar "Calculator" button is used to bring up the SchoolWise® calculator program. This is a really helpful tool.
Calculator - [Ctrl+F] - The toolbar "Calculator" button is used to bring up the SchoolWise® calculator program. This is a really helpful tool.
SchoolWise Desktop - The large empty space with the picture of the globe and school supplies, is called the SchoolWise Desktop. This is where all of the forms that you launch show up. You can resize and change the original position of any forms that you use and SchoolWise will remember where you had them last. To resize click and drag the bottom right corner of any form, to move the window – just click and drag the title bar to where you want it in the SchoolWise Desktop. Also, if you want to reset any form to its original size and position – right click on the background of the form and select (left click) Original Size from the menu. Whatever size & position the form is in when closed – that’s what will save.
Form Launch Toolbar – is located on the left side of the Main Window. This will be the most frequently used toolbar in the program. Just click on any of the Icons to launch their corresponding form. You will notice that this toolbar can have forms float over it – covering it up – if you need to see this menu click the SchoolWise Menu button located on the Status bar and the Form Launch Toolbar will pop up. Below is an overview of each Form and what it contains:
 The "Students" button opens the Student Details Form. This form displays only students currently enrolled in the active school. (No matter what year you are logged into) Student details are displayed one student at a time; by last name, first name & middle. This form allows you to view or edit a students': Personal Info, Class & Program Enrollment, Family Information, Actions, Discipline, Marks, Testing, Meal Status and Records, Medical History, Forms and other Custom fields.
 The "Schools" button opens or closes the School Details Form. This form displays SCHOOLS IN THE CURRENT DISTRICT by default. School details are displayed one school at a time; by name. This form allows you to view or edit the Contact Information of a school. It also lets you add Extra Info Items, change; Grade Levels, Rooms, Marking System & Grad Requirement settings. You may also show schools from other CA Districts or Schools.
 The "Staff" button opens or closes the Staff Details Form. This form displays only staff that are currently assigned to the active school. Staff details are displayed one staff member at a time; by last name & internal ID. This form allows you to view or edit a staff members': Personal Information, Statistics, Actions, Schools, Schedule and Meals.
 The "Courses" button opens the Course Details Form. This form displays only Courses & Programs that are assigned to the active school. By default the courses shown are Grade Level (ADA) courses. You may change the view to see Course & Program details are displayed in list form on the left, sorted by Local ID, Name, CBEDS code and Marking System. This form allows you to view or edit Course Details. It also is where you add Sections.
 The "Enrollment" button opens the Class Enrollment Form. This form displays all students, by class, currently enrolled in the active school. This form allows you to manage class enrollment functions.
 The "Marks" button opens the Marks by Class Form. This form displays all students, by class, currently enrolled in the active school. This form allows you to manage all mark functions.
 The "Attendance" button opens the Class Attendance Form. This form displays all attendance records by class. Attendance details are displayed in list form and are sorted by date. This form allows you to view or edit Student Attendance by Class.
 The "Test Scores" button opens the Standardized Test Scores Form. This form displays all standardized test results.
 The "Meals" button opens the School Lunch Program Form. This form displays all students and/or staff members, by name. This form allows you to scan in student or staff meals & make payments to student or staff accounts.
 The News form is our way of keeping you up to date on deadlines and other news items that may be important. If we send out a new news item this will launch when you login to SchoolWise. After you read the news you may set the window to show only when the news updates by selecting that option in the top right hand corner.
 The "Reports" button allows you to Open the Report Explorer. It either launches the Report Explorer and/or displays a list of any reports that you have set to your favorites.
Status Bar - The final part of the Main Screen is the Status bar, the bar located directly on the bottom of the SchoolWise window. The Status Bar contains information that may be useful to see while working in SchoolWise. See below for an image of the Status Bar.

- Directly to the left is the SchoolWise Menu button – clicking this button will pop up the Form Launch Toolbar if it is hidden under any open windows that you may have placed over it.
- To the right of the copyright button there are several info boxes that display what user name you are logged into SchoolWise as, also an; Insert, Num Lock and/or Caps Lock key indicator along with the currant time and date. If you notice that the time and date are incorrect – you can change this by double clicking on the clock located in the bottom right hand corner of the Windows taskbar. Or go to the Windows start button – control panel – date & time.
![]() You may also notice the gold lock icon on in the Status Bar. This is useful if you want to lock out SchoolWise temporarily. You might want to leave it running but don’t want other people to see what’s on the screen or make changes while you step away from your computer. Just “double click” on this icon to lock the workstation. SchoolWise will then be locked, until you enter your password to unlock it.
You may also notice the gold lock icon on in the Status Bar. This is useful if you want to lock out SchoolWise temporarily. You might want to leave it running but don’t want other people to see what’s on the screen or make changes while you step away from your computer. Just “double click” on this icon to lock the workstation. SchoolWise will then be locked, until you enter your password to unlock it.