
Course Setup Overview
The Courses form can be launched from the left toolbar by selecting Courses.
Note: SchoolWise comes pre-loaded with default courses that should relate to your school type, these are a good start but you may need to edit or add courses, and you will need to set up the sections within each course.
Courses – A course is defined as any ADA Grade Level, Academic Class, or Activity List that a student can be enrolled into. To create a new Course – first select what type of course - Launch the courses form, click the new icon (or right click the course list), enter the Local ID (should be unique), long & short name of the course, set the required fields then click the Save icon. You can set the other fields as needed.
Sections – Before any student can be enrolled into a course of any kind, a section has to be created for that course. Click on the course that you wish to create a section for – from the list on the left. To the bottom right of the form you will see the Section area. This is where you create the Section for the year.
Course Types
Select the desired tab at the top of the Courses form to see the list of associated course types.

ADA Grade Levels - This list includes ADA course sections for maintaining all-day attendance and enrollment records that are not tied to specific academic subjects. Marks (grades) are not typically maintained in ADA course sections. SchoolWise often refers to the Grade Level class as the 0H class (Period 0 / Homeroom). Every student must first be enrolled into an ADA grade level before being enrolled into other courses or programs.
Courses - The list includes academic classes (such as Math, English, Science, History, and Social Studies, etc) and non-academic classes. Classes do require a CBEDS code & can be setup with their own marking system and period attendance tracking. Make sure to set Grad Requirements for Academic classes if you are planning to do Student Transcripts.
Activities – Activities are student lists used for any other non-academic purpose. Ex. Field trips, bus roster, sports roster, etc.
Setting up ADA Grade Levels and Sections
Click on the Courses button on the left toolbar and then select the ADA Grade Levels tab.
A separate course should be created for each grade level.
For ‘Long-Term Independent Study’ Instruction, a separate course should be created for each grade level. Click here for additional instructions.
For 'Home & Hospital’ Instruction, some schools create a seperate couse for each grade level. Some schools leave the student enrolled in the normal ADA grade level course. It really depends on your auditor's preferences. The CDE provides some general information here: https://www.cde.ca.gov/sp/eo/hh/hhprogramsummary.asp
Setting up Academic Courses and Sections
Click on the Courses button on the left toolbar and then select the Courses tab.
To create a course, click on the New button in the top menu bar or right click on the course list and select add new course.
A gradebook will be created for every academic course with a corresponding section. The basis for determining how many academic courses to establish is the number of gradebooks that teachers want to have. Even though elementary school students may stay in the same room all day with the same teacher, courses need to be established so that the teachers will have one gradebook for every subject. This is required for allocating course credits and calculating GPAs.

Course Names
All courses should have a unique local ID. Enter the Local ID and Course Name. The optional Course Short Name is used in many UI displays and reports where space is limited.
For elementary and middle schools that use A – F gradebooks and report cards, the example below is a good one to follow. The subjects generally taught are Math, Science, English or Language Arts, History or Social Studies, PE, and maybe an elective. All of the grade level courses will sort together if you preface the courses with a grade number as shown below.
4LA | 5LA | 6LA | 7LA | 8LA |
4Math | 5Math | 6Math | 7Math | 8Math |
4Sci | 5Sci | 6Sci | 7Sci | 8Sci |
4SS | 5SS | 6SS | 7SS | 8SS |
4PE | 5PE | 6PE | 7PE | 8PE |
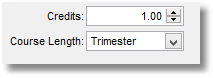
Credits and Course length fields

Credits, while not required for elementary and middle schools, are still used to calculate GPAs by weighted average. For example, if you want the academic classes to weigh more than PE in the GPA, you would give them more credit. Make the credits a multiple of the type of marking period. Trimester credits should be a multiple of 3, and quarters a multiple of 4. The reason for this is that each trimester divides the total credits by 3 (and quarters by 4) so each trimester or quarter receives one-third or one-fourth the total credits for the year. If, for example, you want the academic classes to weigh twice as much as PE in the GPA, under a trimester system you would make the academic classes worth 6 credits and the PE classes 3 credits, or in a quarter system you might use 8 credits for academic and 4 credits for PE. This becomes very important because parents and students often divide reported GPAs by the number of classes without understanding the underlying weighted calculations and then insist that the calculations are wrong. They’re not.
If you use some trimester or quarter-length classes (as opposed to yearlong classes) such as electives, then those courses should only receive 1 credit since they only exist for one marking period.
In summary, yearlong classes should receive the total credits to be divided by the number of marking periods, and quarter or trimester classes should receive one-third or one-fourth the yearlong credits. High schools generally have 10 credits per full year course and 5 per semester as specified by Ed Code and college entrance requirements.
The Academic Class flag is only used for GPA calculations, as some classes are excluded from the AGPA (academic GPA) - usually subjects such as PE or Art, that still get marks, but don't count towards AGPA.
Changes to the credits and marking system values should be made with caution. When a mark is entered, records are created for Attempt & Earned credits. These values are based on the course settings and marking system values in effect at the point in time when the mark is entered. If a mark is deleted or changes are made to the course credit value or marking system values after a mark has been entered, the Attempt/Earned credits are not automatically recalculated (as that would impact calculated GPAs for all past years). The Attempt & Earned credits need to be manually updated by opening the marks form and then typing in the new values.
Once one or more sections exist for a course, you can no longer change the course term length. A new course needs to be created if a different course term length is desired. The old course can be closed if it will no longer be used.
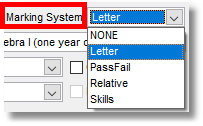
Marking System
Very Important: Marking System must be set to 'Letter' to support letter-grade gradebooks or 'Skills' for standards-based gradebooks. If both letter-grade and standards-based gradebooks are being used, the Marking System should be set to Letter.
Department field
This field is mostly used for ADA calculations and can be ignored in most academic classes (except for IS courses). The department code can be used for report card academic course sorting purposes.
Report Card Sorting Tips
Courses are normally sorted based on the alphanumeric course name. If an alternate course sort order is desired, the course department code can be used for academic courses. This course sorting trick can’t be used with ADA day classes (the ADA department should always be used, otherwise it will mess up grouping on the ADA reports).
To establish an alternate academic course sort order:
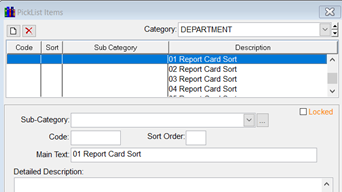
An alphanumeric department code pick list is required. The pick list can be created/edited in the desktop SIS (District Setup Pick-List Items Setup). Only the Main Text field is used for report card course sorting.
Once the pick list has been established, the alphanumeric department code (01, 02, 03, etc.) needs to be assigned in the desktop SIS for every active course. Ex. Use 01 for ELA, 02 for Math, 03 for Other, etc.
SBGB Skill Sorting Tip: Skills linked to a course in a standards-based report card can be sorted using the Skill Group Code and Skill Code in the skill set. These codes can be left blank or you can use a Common Core code or just a number. If left blank, the sorting order is alphanumeric based on the skill text. However if there are skill codes, they control the sorting order, meaning that you can use these codes to set the sorting order of the skill group and the skills within their group. Click here for more information.
The Course State Code (CBEDS Code)
All TK-6 ADA courses should be set to 1000. CALPADS expects only one class for grades K through 6, and that is the ADA self-contained class.
All TK-6 academic courses should be set to 6012. Classes with a 6012 CBEDS Code are excluded by SchoolWise from CALPADS CRSC and SCSC extracts because CALPADS does not require grades for academic courses in TK-6. This is very important and prevents needless CALPADS errors!
CALPADS CRSC and SCSC records are optional for academic courses in grades 7 & 8. These records can only be submitted for academic courses that use traditional A-F letter grade marks (not standards).
Normally, ADA 7 and ADA 8 would be set to 6012 and then applicable codes entered for grades 7 & 8 academic courses. If CBEDS codes are assigned to the 7 & 8 academic courses, you can use this basic list as a guide:
9100 English (Departmentalized K-8)
9170 History-Social Science (Departmentalized K-6)
9240 Math (Departmentalized K-8)
9290 Music General/Classroom/Exploratory (Departmentalized K-8)
9311 Physical Education (Departmentalized 6-8)
9320 Science (Departmentalized K-6)
9380 Media Arts (Departmentalized K-8)
CRS - Content Standards Alignment Code
This code defines the currency of the standards that were used to develop the content of a course. It's required for CALPADS CRSE export.
If the Grade Range is set to 'Not Applicable', then the Content Standards Alignment Code must be set to '3 - Not Content Standards-Aligned or Not Applicable'.
If the Grade Range is not 'Not Applicable', then the Content Standards Alignment Code cannot be set to '3 - Not Content Standards-Aligned or Not Applicable'. Select 1 or 2 as appropriate.
NCLB Core Code
This code is no longer used as CALPADS dropped it from their file spec.
Creating an Academic Course - Example

Right click on the list of courses and select Add New Course.
At the top of the page type in the following (assuming this is a grade 6 math course):

Local Id: 6Math
Short Name: Math 6
Long Name: Math 6

Credits: 3 for a trimester, 4 for a quarter, or 10 for a high school
Course Length: Full Year

Marking System: Letter
CBEDS Code: The easiest way to set the CBEDS Code is to open the code list by selecting any code, 1000 being the first option for example, and then typing quickly 6012. Scrolling down to find 6012 out of hundreds of codes is very time-consuming. Simply highlight any code and then type 6012.
Creating or Editing Course Sections
Students are enrolled in sections of courses. The difference is that a course like Math 6 will be taught year after year. A section of Math 6 exists for only one year, taught in one particular room by a particular teacher to a particular set of students.
Select a course for which you want to create or edit a section.

![]() To create a section, click on the New button in the lower right-hand corner of the course form.
To create a section, click on the New button in the lower right-hand corner of the course form.
To edit a course section, click the Edit button in the lower right-hand corner of the course form. You can also right-click or double-left-click to open the section form.
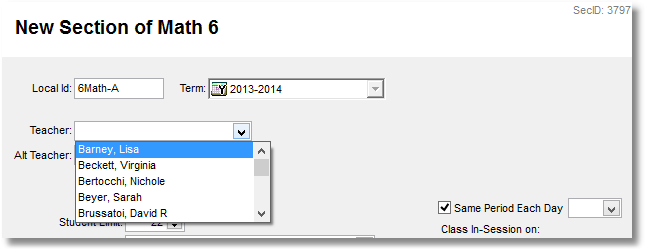
Assign a Teacher to a Course Section
Open the course section form, choose the teacher from the dropdown menu, set/edit the other section parameters as desired, and then click OK.
Refer to the CALPADS Fall 2 File Submission Guide for additional staff record management tips.
Co-teacher
Click here for detailed instructions to add or remove an additional teacher.
Click the + to add an additional teacher and then select the name. Click OK when done to save the changes.
If an additional teacher needs to be removed, highlight the name and press the Delete key. Click OK when done to save the changes.
A course section co-teacher with 1-99% time gets write access to that individual class section gradebook. A course section co-teacher with 1% time is excluded from the CRSE Export. A course section co-teacher with >1% time is included in the CRSE Export.
A course section co-teacher with 0% time gets read-only access to that individual class section gradebook. A course section co-teacher with 0% time is excluded from the CALPADS CRSE Export.
Using a Split Term for a Section
If teachers are changing mid-term, do not delete or replace the teacher, but instead use the Split Term button.
If more than one teacher was the teacher of record during specific times throughout the year, you need to use the Split Term feature. You would click on the Split Term button and set the date that the new teacher is taking over as the teacher of record. You would then change the name to the new teacher and you are good to go. This is important to accurately reflect who was the teacher of record and when for CALPADS.