

Using the Report Explorer
There are over 1500 reports available to you in the SchoolWise Desktop Report Explorer.
Note: We also have SchoolWise Web Reports which have been developed specifically for web content such as teacher gradebooks, online registration, web portal accounts, etc. Click here for more information on Web Reports.
The extensive amount of reports may be overwhelming at first, but there are a few tools described below that will help you to locate what you’re looking for. When you first launch the Report Explorer from the bottom left side button, you will see the screen below. The three main parts of the Report Explorer screen are the Search Tool (top lefty hand corner), the Category List Tree (left side panel) and the Report Description & Documentation Area (the entire right side of the form).


To overview the process of locating a report - the Search Tool is always the first place to begin. If you can’t find what you need there then you may browse through the Category List. Don’t be afraid to look at the description and documentation to the right as well. Every reports’ functions are explained and detailed in the right side column. There is allot of helpful notes and solutions to common issues in the report documentation as well. Keep reading the next section for detailed instructions on how each part of the Report Explorer works.
How do I find the report that I need?
If you ever get stuck trying to locate the report that you need, please don’t hesitate to contact SchoolWise support for assistance. That being said, we have spent focused time assigning keywords to all of our reports. If you ever have a suggestion of a report that needs to be tied to a new keyword, please let us know. Remember that using the Search Tool is usually the fastest way to find what you are looking for.
Using the Report Search Tool
The First place that you should start to find the report that you are looking for - is the Search Tool. The Search Tool is located in the top left hand corner of the main Report Explorer window. To find a report all you have to do is type in a keyword and then hit the “Enter” button. In the example below the word “Barcode” was used to try to find a report that would allow us to print barcodes.
When searching, keep in mind that Less is More. The more specific you are with your search – the less results you may get. To get more results from your search, use fewer keywords or maybe just a few letters from a keyword in your search. Another helpful search hint is: If your supervisor is asking you for a specific list or data printout – ask them if it’s for something specific. You may find the report under the name of the report they are working on.

Once the keyword is typed in, hit the “Enter” button to show the results screen displayed in the Category Tree as seen below:

Browsing the Category List Tree
If you can’t find the report that you need by using the Search Tool, you may want to browse the Category List. You can scroll up and down the Category List and “expand” each category to see the reports contained inside that specific category.
As seen below, we are looking for some CALPADS extracts so I “left clicked” on the ![]() icon to the left of the File Exports – CALPADS Folder. The tree list then expands to show all of the reports that are in this category.
icon to the left of the File Exports – CALPADS Folder. The tree list then expands to show all of the reports that are in this category.

Often, browsing the Category List Tree is a good way to see what reports may be available to you. Sometimes you may know that you want a roster, so browsing the roster category would be a good place to start.
Adding a Report to Favorites
Now that you understand how to locate the report that you need, you may want to add it to the Favorites list. Adding reports to the Favorites list is good way to keep all of the frequently used reports easily accessable to you or other users. There are two Favorites lists that are available to you, Personal and School. If you “right click” on any report name you will see the menu below:

By adding a report to your Personal Favorites, it will save to your list only. In the example above when the user “Administrator” logs in – they will see this report in their Favorites list.
If you choose to “Add to School Favorites” then the report will show under any user that has access to the current school you are logged into. This may be helpful when building a list of reports commonly used by everyone.
Adding User Notes
Located in the same “right click” menu is a selection called “Add User Notes”. By choosing this option you may add any notes that you choose to any report. Maybe the notes are to help you identify when to use the report or just helpful hints, it’s up to you.

Once you add user notes to a report – they will show up underneath the report description to the right. As seen below:

Understanding the Report Description and Documentation
As mentioned before, the entire right side of the Report Explorer window contains the Description and/or Documentation of the selected report. In the example below, we selected or “left clicked” on the report named “Class Rosters (Simple) 1 Per Page” (once selected, you will see it highlighted in blue). Notice the Report Description area now displays the Description and Documentation for the “Class Rosters (Simple) 1 Per Page” report.

Using the previous example of the “Class Rosters (Simple) 1 Per Page” you can see an example of the Description and Documentation page for that report below:
1. Directly under the report title is a basic description of what the report contains by default. In the example here you can see that this report Displays Class Rosters, what fields it includes and the default sort order. 2. The Second section lists each of the “Parameters” in the report. Parameters are kind of like Options that you may choose to further tweak or customize the reports’ data. 3. Alternate Report Layouts are listed here. These reports are very similar to the main report in the title but maybe have a different look/feel or added fields to them. | 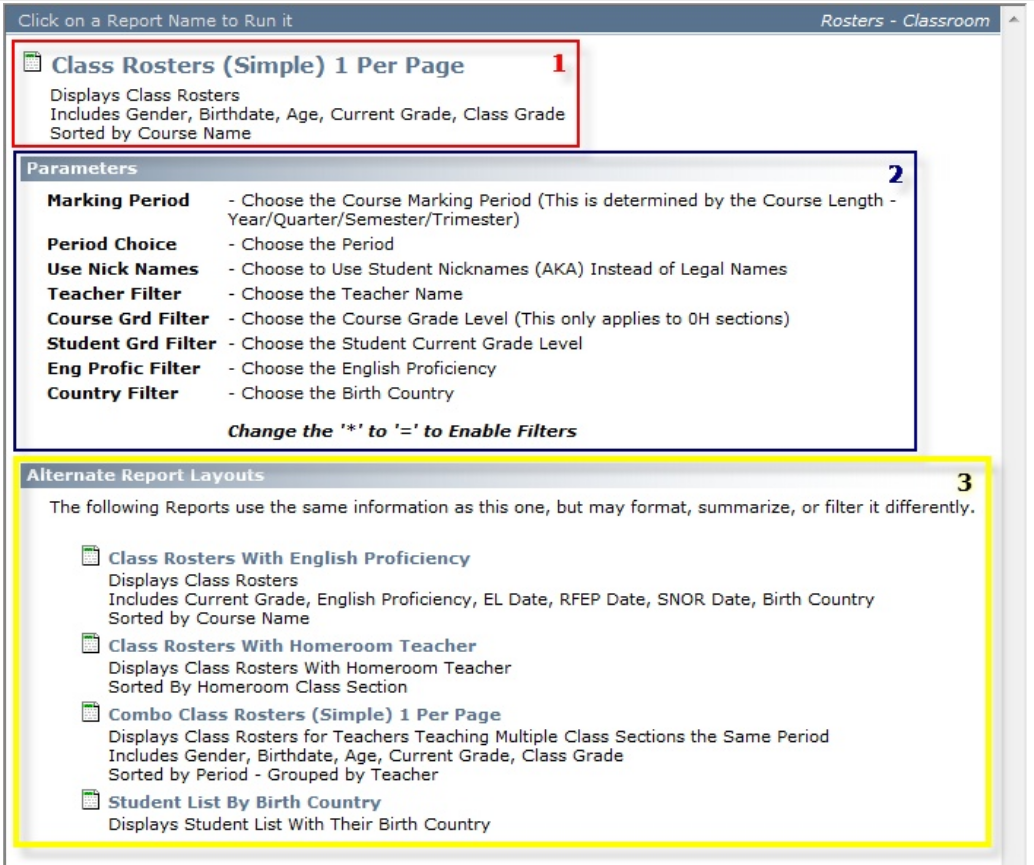 |
Often you will find hints and tips along with extra documentation regarding the report that you are using on this same page. It’s a good thing to look over to the right and familiarize yourself with the helpful information in this area.
How do I run reports?
Please make sure that you are logged into the correct school (not the district) and school year.

There are several ways that you can run a report in SchoolWise. “Double clicking” on the report name will run a report normally. “Right-clicking” and then selecting “Run Report” from the menu will also run the report normally. There are two icons on the menu bar that can also run a report but we will start with the first one.
![]() By “left clicking” on this button, the report will run normally and launch the report form as seen below. As seen in the example, there are multiple Parameters or Options that you can select to change the data that will be displayed in the report when you click the ‘Run” button.
By “left clicking” on this button, the report will run normally and launch the report form as seen below. As seen in the example, there are multiple Parameters or Options that you can select to change the data that will be displayed in the report when you click the ‘Run” button.

There are lots of Parameters in hundreds of reports that vary from report to report but they all work the same way. Below is an overview of each of the Parameters on this specific report and how they can be used.
|  |
Once you have selected the Parameters that you want, left click the RUN button to see a Print Preview of the report on screen. You may then print the report by selecting the Printer icon in the top menu.

![]() By “left clicking” on this button, the report will run as an export to Excel. You may also run almost any report as an export to Excel from within the report form. Just check the box in the top right-hand corner of the report form. Keep in mind that if you do export a report to Excel format it will not retain the formatting that you see on the screen in the print preview. It will separate the data into the correct fields in the Excel format. Once you run the report, you may then “left click” the “Run” button to show you the Print Preview.
By “left clicking” on this button, the report will run as an export to Excel. You may also run almost any report as an export to Excel from within the report form. Just check the box in the top right-hand corner of the report form. Keep in mind that if you do export a report to Excel format it will not retain the formatting that you see on the screen in the print preview. It will separate the data into the correct fields in the Excel format. Once you run the report, you may then “left click” the “Run” button to show you the Print Preview.
Note: There are many Reports and Parameters in the SchoolWise Report Explorer to choose from. Sometimes it is easy to get confused and feel overwhelmed. If you can’t find what you are looking for, or what your Supervisor has asked you for sometimes it’s good to ask what the report is for. The keywords that we have linked in the search should help you find what you need quickly. We are always building on the keyword list and trying to improve the search, but don’t hesitate to email us or call 1-800-727-6817.
Troubleshooting Report Printing Issues
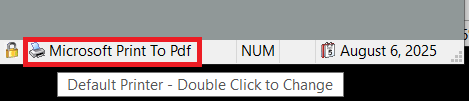
Sometimes, a report preview may appear incorrectly formatted if you are using an incompatible printer driver. In the bottom right-corner of SchoolWise you can see the default printer. Try changing the default printer (double click to change) to something common like 'Microsoft Print To Pdf'. The report engine will use that printer driver to generate the report preview. Then when you print the report, make sure the 'Print to Default Printer' is unchecked so that you can choose your desired printer.
For other report troubleshooting tips, click here to see our Report FAQ's.