

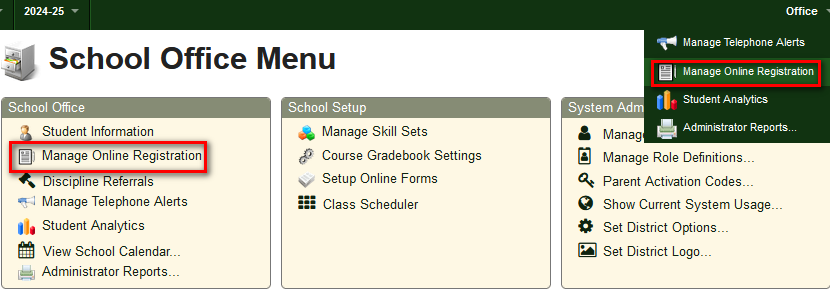
Once the online registration forms have been completed by a parent, the forms can be accessed by your school administration from the online registration management console. Click the “Manage Online Registration” link from the School Office Menu landing page or Admin dropdown menu. Ensure you select the correct school year as online registration forms are linked to packets published for a specific school year.
- Various “Packet Status” online registration web reports are available. Click here for more information.
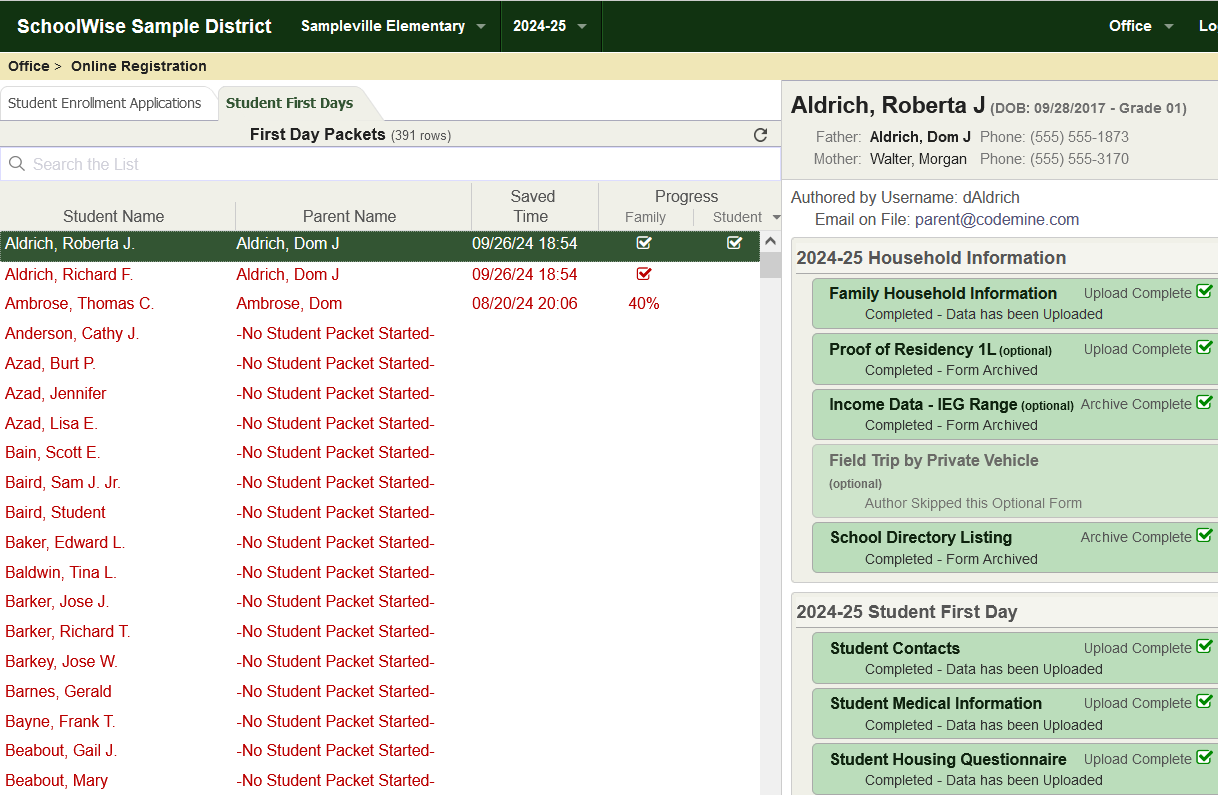
- The management console shows the registration packet status.
- Different types of form packets are shown on the corresponding tabs.
- You can search for a student’s name or a parent’s name.
- You can sort the various columns in ascending or descending order.
- Forms are only shown in the management console after the form packet has been opened by a parent/guardian.
- The “Student First Days” tab contains 2 form packets, which are linked together, the annual “Family Household Information” forms and “Student First Day” forms.
- Each family has a Household Information packet (which must be filled out first). This household packet includes common forms for a family that only have to be filled out once, even if there is more than one student per family (ex. Family Household Information, Proof of Residency, NSLP F/RP Application, Alt Income Survey).
- Each student has a Student First Day Packet. This student packet includes forms linked to a specific student (ex. Student Emergency Contacts, Student Medical Information, General Consent).
- All enrolled students are shown in this packet list. Unenrolled students are excluded from this packet list if no form records exist. The Packet Status - (Household Information/First Day Packet) web reports only show enrolled students (all unenrolled students are excluded).
- The Progress % identifies the % of forms that have been completed in the packets. Once a packet has been approved and uploaded, the Progress % value will change to a checkmark.
- If a parent has not opened their annual first day packet yet, the entire row will be red and the Parent Name field will say “No Student Packet Started”.
- If the progress status is blank for the Family/Household forms, that means they have not opened the “Household Information” form packet.
- If the progress status is blank for the Student forms, that means they have not opened the “Student First Day” form packet.
- The “Student Enrollment Applications” tab contains “New Parent Information” forms (if applicable) and “Student Enrollment Application” forms.
- The Progress % identifies the % of forms that have been completed in the “Student Enrollment Application” packet. Once a packet has been approved and uploaded, the Progress % value will change to a checkmark.
- For Student Enrollment Applications, the date/time of the packet completion is shown to aid in student enrollment prioritization.
- For Student Enrollment Applications, the requested school year enrollment date is used to sort the applications in the management console. If the application packet is published for the upcoming school year, the student enrollment application form can also be used for ongoing enrollment in the current school year while still in session. In this scenario, you could receive new applications for the current school year or upcoming school year. Select the appropriate school year you want to review in the drop-down picklist.
- New parents who have filled out the “New Parent Information” packet are identified with a "New" prefix before their name to distinguish them from existing parents.
Viewing Form Data
- The individual forms are shown on the right side of the online registration management console.
- Click on an individual form to open it. Click the appropriate button on the top of the form to edit/return/approve/reject the form.

- A completed form can be printed from 'Manage Online Registration': Individual online registration forms can be printed for offline use by opening the form and clicking the print button. Forms can’t be bulk printed (you can't print all forms in one print job).
- We have many online registration reports available in the SchoolWise Web to access form data. Click here for more information. We also have many reports available in the SchoolWise Web and SchoolWise Desktop to access the critical data which is synced to the SIS.
Editing Form Data
- Forms can be edited by a school admin or returned to the original author (parent/guardian) for editing.
- No automatic notification is sent to a parent/guardian if you reject a form or return a form to them for editing. You must contact them to provide feedback. If they open the form packet, they will see a form status note (ex. Rejected by Administrator).
- If a school admin returns a form to the author for correction, the system waits for the author to resubmit the corrected form. A school admin can edit the form and bypass this requirement by clicking on the edit forms link (top right corner) and then clicking on the all done link (bottom right corner).
- Sometimes editing a particular form (ex. Student Enrollment Application) may require all forms in that packet to be reviewed/edited. If the edited form declares one or more global variables, then saving that form (which may include a change to the global variable value), forces all following forms in the packet to be re-edited, since changing the value of a global may enable/disable or show/hide various fields, or show/hide other whole forms, or change validation rules for the remaining forms in the packet.
- If a form has been edited, it will need to be approved before it can be uploaded/archived.
- Once a form has been approved by a school admin, it is then locked to prevent further editing by the original author (parent/guardian). A school admin can still edit the form or return it to the original author for editing (if the form has not been uploaded/archived). If the form has already been uploaded/archived, it can’t be returned to the original author (parent/guardian) for editing.
- Once a file (picture/document) has been attached in a form, it cannot be deleted but it can be replaced with a different file, by either the original author (parent/guardian) or school admin. Just click on the original file and then select and attach a different file.
SIS Data Management Tips
- When the online registration form packets are first opened by parents/guardians of existing students, the critical forms pull live SIS data which can then be edited by parents (if needed) and ultimately saved to the SIS when you approve and upload the form packet. These critical online forms include a snapshot of data at one moment in time; they are not updated continuously to reflect ongoing changes to the live SIS records. The Family Household Information form, Student Emergency Contacts form, and Student Medical Information form are examples of critical forms which are synced to the SchoolWise SIS records.
- Once the household/student first day form packets have been opened, changes to the live SIS records for family records should not be implemented until after the form packets have been uploaded. If students are moved from one family to another family during this time period, the household/student packet link will be broken. If family member contacts are added/deleted during this time period, the online registration student contacts form may contain conflicting information. If household address records are changed during this time period, the online registration household form may contain contradictory information.
- Don’t make changes to live SIS records immediately before or after the associated online registration form has been uploaded. Adequate time is required to save the form changes to the SchoolWise web database and sync these changes to the SchoolWise desktop database. Changes made to live SIS records during this time period may override the online registration form changes.
Form Approval & Upload
- All critical forms must be reviewed and approved individually by a school administrator!

- When the online registration form packets are first opened by parents/guardians of existing students, some of the critical forms pull live SIS data which can then be edited by parents (if needed) and ultimately saved to the SIS when you approve and upload the form packet. Check “Highlight Changed Values” to identify changes. Pay special attention to changed values before you approve and upload any form packets!

- For any online form that has an Admin Only section, you just have to add/edit the admin data and then click “Save Administrator Data”.
- The Upload/Archive Packet link will be enabled on the right side after all the critical forms in the packet have been approved. Click on this link to upload/archive the form data. Note that the First-Day packet includes 2 sets of forms (household and student) which must be approved and uploaded!

- When a form packet is uploaded, critical data syncs to the SchoolWise SIS but much of the reference data only resides in the SchoolWise web online forms. Each form will say “Upload Completed” if it contains data that syncs to the SIS or “Archive Complete” if it contains reference data.
- Once a form packet has been uploaded, the forms are locked and can't be edited by a parent/guardian. Any further changes to critical records must be implemented with the live SIS records (to avoid data corruption because of conflicts in data changes made at different points in time between the online forms and live SIS records). If enabled, archived forms can be edited by school administrators after the form packet has been uploaded without impacting any live SIS records.
- The upload function is disabled for all packets after the ScyID of the packet is over. This is usually long after the close date of the packet, but it should help ensure data from old school years is never uploaded by mistake.
Form Data Sync
- Critical data is synced between the SIS database and specific online registration forms. The Family Household Information form, Student Emergency Contacts form, and Student Medical Information form are examples of critical forms that are synced with existing SIS records. When a form instance opens for the first time, it queries the current values of the SIS database fields it uses. When a school admin approves and uploads a packet, any modified form data is then written back to the SIS database.
- Desktop Forms Checklist: Online registration form data doesn't sync to the desktop forms checklist or associated desktop forms reports. The desktop forms checklist is used for manually tracking form records (for those who don't use online registration forms).
- The Home Language Survey form is a data collection form, it does not set the student’s initial EL status. The student enrollment application form sets the student’s initial EL status. If the student enrollment application form says their primary language is English, the eng_lang_status is set as EO. If the student enrollment application form says their primary language is not English, the eng_lang_status is set as TBD. The EL status can be changed in the desktop SIS student form by selecting it from the drop-down list.
- The Student Housing Questionnaire housing type syncs to the “Res Status” field in the desktop SIS family form. The Student Housing Questionnaire does not sync to the desktop SIS Programs Enrollment Status form to automatically enroll/unenroll a student in/out of the “Homeless” program. Enrollment status in the “Homeless” program must be set manually in the desktop SIS to ensure schools validate the information provided by parents and define the enrollment start date or unenrollment end date.
- The NSLP Application for Free and Reduced-Price Meals is a data collection form. Currently, you have 3 options to utilize this form data: you can view the individual forms online, print the individual forms, or run a web report to extract the critical form data. This online registration form does not automatically determine a student’s free or reduced-price meal (FRPM) eligibility or any other program eligibility. If eligible, a student’s program status must be set manually in the SIS student form to ensure that school staff validate the information provided and define the program start/end dates.
- All alternate income forms (AIF) are data collection forms. These online registration forms do not automatically determine a student’s eligibility for any program or benefit. Currently you have 3 options to utilize this form data: you can view the individual forms online, print the individual forms, or run a web report to extract the critical form data.
- The UBA is a data collection form. This online registration form does not automatically determine a student’s eligibility for any program or benefit. Currently you have 3 options to utilize this form data: you can view the individual forms online, print the individual forms, or run a web report to extract the critical form data.
New Parent/Student Enrollment Management Tips
- New Parent Information: Once a new parent information packet has been approved and uploaded, a new FamID record will be created in your SIS and the parent/guardian contact information in this form will be uploaded to the SIS. The restricted registration web account will be automatically converted to a regular Parent Portal web account. This new parent information form should not be used by an existing parent/guardian who has/had a child enrolled in this school district. If the parent/guardian records already exist in your SIS and you upload this new parent information form, duplicate records will be created in your SIS (which would need to be reconciled).
- New Student Enrollment: Once a new student enrollment packet has been approved and uploaded, a new student ID record will be created in your SIS and the student information in this form will be uploaded to the SIS to enroll the student in school. This new student enrollment form should not be used to enroll (or re-enroll) an existing student. If the student records already exist in your SIS, you should enroll (or re-enroll) the existing student using the desktop SIS. If the student records already exist in your SIS and you upload this new student enrollment form, duplicate student records will be created in your SIS (which would need to be reconciled).
- The new parent information and new student enrollment application packets can be rejected if they have not been uploaded. Click the hamburger menu on the top right corner of the packet to ‘Mark Packet Rejected’. Once a packet has been rejected, it can be deleted if desired. Student Enrollment Application packets with no completed forms and abandoned New Parent Information packets (no student enrollment applications started) can be deleted directly, without needing to reject first. Rejected packets still show in admin console and may be un-rejected. Deleted packets are deleted from the admin console. Do you need to reconcile duplicate family records or duplicate student records? If you have already uploaded the packet(s) and created duplicate records, click here for Student Family Record Management Tips.
- Student Enrollment Approval Tip #1: Ensure the school, grade level, school year, and school enrollment date is set correctly in the office section of the student application form. You can add an enrollment effectivity date if desired (if left empty, it will default to the first day of the upcoming school year or the packet upload date of the current school year). The Student Enrollment Information form can be edited to change the enrollment information if the form has not been uploaded. If the form has been uploaded with the wrong enrollment information, it can be changed in the Desktop SIS student form. Click here for more information. You can change the school enrollment start date in the Desktop SIS student form or your can bulk change enrollment start dates using the following Desktop SIS report: Enrollment School Year Start Fix Date.
- Student Enrollment Approval Tip #2: When an online registration student enrollment packet is approved and uploaded to enroll a student in your school, the student contact relationships for the household have not been defined yet. The relationship for each student and household contact needs to be defined along with the emergency contacts, pickup permissions, and parental notifications. This data can be entered manually in the SchoolWise Desktop SIS or collected via the online registration first-day packet student contacts form. If this data is needed immediately for reports or automated extracts, it should be entered manually in the SchoolWise Desktop SIS. Click here for additional help.
- Student Enrollment Approval Tip #3: If you want to rescind the school enrollment for a pre-enrolled student after you have uploaded the student enrollment packet, the school enrollment record can be deleted in the Desktop SIS student form. Click here for more information.
- Student Enrollment Approval Tip #4: If an old enrollment packet was completed and the enrollment school year can’t be corrected in the new student enrollment form, you have 2 options to consider:
- Approve the old student enrollment packet and then change the school enrollment start date in the Desktop SIS student enrollment form. Click here for more information.
- Reject the old student enrollment packet and ask the parent/guardian to complete a new student enrollment packet. A new parent/guardian will also have to complete a new parent packet.
Form Management Examples
An example is shown below with the Household Information Packet and First Day Packet. Click on any student name to view the details of each form on the right hand side. Each online form that has been filled out and submitted to the school will have an indicator in the top right corner of the form.

When you click on: Needs Approval the form will open up as seen below with a choice selection toolbar directly under the title. By default Highlight Changed Values will be selected. This will show you changes that were made to the form for you to review:

Each form status and the selections you can choose are listed below:
Edit Form Data - choosing this allows you to directly edit the form and make any changes. This can be used to fill out the form for parents in the event they are having trouble, or you can use it to change anything that needs to be corrected. Once you edit the data you can click Submit to School and this will change the form status back to "Needs Approval".
Before a parent enters any information or reviews a form the status will say "No Data" as below:

Once a parent has entered information on a form and chooses Submit to School, the status will change to "Needs Approval" as seen below. Click on it to change the status.

Return to Author - choosing this sends the form back to the parent for them to make changes and sets the form status to "Returned to Author for Correction". Once the parent re-submits the status will change back to "Needs Approval".

Approve for Upload - this will approve the form and change the status to Ready for Upload as below:

